
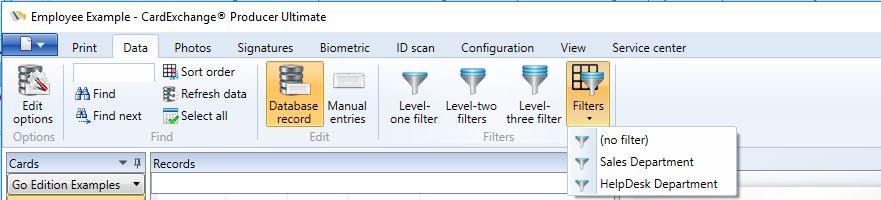
Level Two filters are a series of named filters that the operator can activate or deactivate freely in order to limit the number of records shown in the Data Record View. They are normally defined and named by the administrator. The filter names are shown as buttons in the Filters Tab of the Explorer Menu. By clicking on a filter button with the text (no filter) all filters are deactivated. The status bar shows which Level Two filter is active.

Adding Level Two filters starts by clicking on the Edit level two filters button in the Filters section of the Data tab.
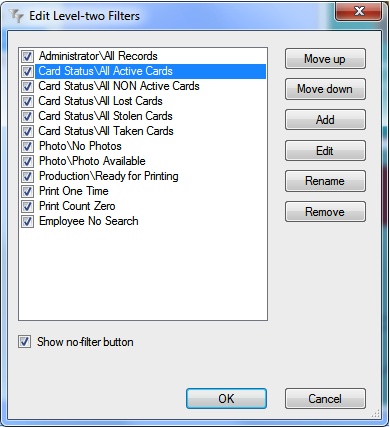
The Window that opens manages the different created Level Two filters. This manager offers you to add or edit new and existing filters, rename or remove them, or change the position in the Filters Tab of the Explorer Menu by moving them up or down. Administrators can protect normal operators to view all data by not presenting the No filter button to the user. By deselecting the 'Show no-filter button' the user will only have access to data that is offered when executing the defined Level Two filters.
Adding new filters works exactly the same as described in the section Level One Filters. In fact, for adding a Level Two filter, you can follow the same procedure and there is no need to repeat the actions here. After adding a condition via the Edit menu, your window will look similar to the one shown below.
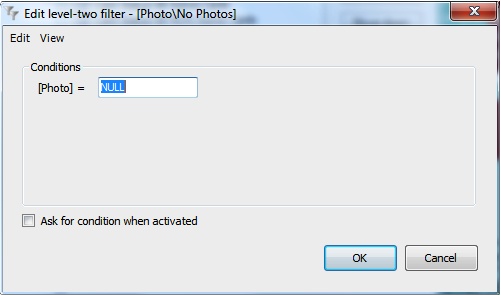
One major difference with the Level One filters is that with the Level Two filters you can define that a condition needs to be asked when the filter is activated. In the screenshot you see that "[Photo]=NULL". When we check "Ask for condition when activated", a window will pop-up asking you to enter the condition for the filter. This can be handy if you create a filter that looks up a employee or student numbers. After clicking OK, you will be prompted to enter a name for the filter.
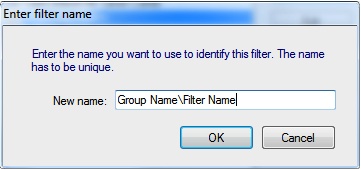
When entering a name for the filter, just like with the card templates, also the filters can be divided into groups. As in the screenshot above, everything before the backslash '\' is considered to be the Group Name and is selectable in the drop down menu directly under the Filters Tab of the Explorer Menu. Everything behind the "\" is considered as the name of the filter appearing as the button. Of course you can also directly enter only the name for this defined filter.
Click on OK to save the filter, the filter will be shown in the Filters Tab of the Explorer Menu. The defined Level Two Filters are also available via the drop down menu in the Filters in the Filters section of the Data tab.
Furthermore, the filter will be applied, showing you how the defined conditions actually affect the data in the Data Record View.
